Reuse table reservation module to build chatbot
OpenCUI offers a convenient way for developers to share modules, allowing for the reuse of existing modules and saving time in creating new chatbots. These modules are designed to be reusable, enabling them to be easily integrated or removed from a service as required. When incorporating modules into a chatbot, it is crucial to ensure that the modules are compatible with each other and the corresponding implementations of service interfaces are also wired. This will ensure that the module works as expected in the chatbot.
To leverage a pre-existing module, the initial step is to identify a module that aligns with your requirements. Subsequently, you can import the module into your chatbot and directly leverage its functionalities. These modules are developed and maintained by other builders, assuring their quality. Moreover, you retain the flexibility to update these modules, ensuring that your chatbot remains up-to-date with the latest features and capabilities. For more background and details about modules, see "Reuse an hours module".
To demonstrate the reuse of modules, we will focus on the tableReservation module. This module allows chatbots to facilitate tasks such as making, viewing, and canceling table reservations. Below is an example of a user interaction with a chatbot utilizing the table reservation module:
User: "Hi, I'd like to reserve a table, please."
Chatbot: "Could you please provide your email address for the table reservation?"
User: "xxxx@gmail.com"
Chatbot: "How many people will you need the reservation for?"
User: "There will be two of us."
Chatbot: "Which day will you be joining us on?"
User: "This Sunday."
Chatbot: "What time would you like the reservation for?"
User: "3:00 PM."
Chatbot: "Are you sure to book a table for 2 at 3:00 PM on Sunday, Jun 8, 2024?"
User: "Yes."
Chatbot: "Your reservation has been made. We'll see you at 3:00 PM on Sunday, Jun 8, 2024."
Before reusing the tableReservation module, it is crucial to grasp the following dependencies:
- Table reservation CUI design: Blueprint outlining the user experience and service scope of the table reservation module.
- Reservation API: The API that the module relies on.
- Google Calendar provider: Backend used by the chatbot to store reservations, requiring a Google Workspace account.
Before you start
- Log in to OpenCUI.
- Refer to the quickstart guide to familiarize yourself with OpenCUI basics.
- Set up Google Workspace and service account.
Set up Google Calendar
Under the reservation API design, businesses need to define resources such as tables or appointments that users can book. These resources are associated with specific locations, and before users can make a booking, the business-specific locations and resources must be set up in the backend. Different backends may have distinct methods of defining available resources for booking. The Google Calendar based backend uses the Google Admin console to define table resources and Google Calendar to store reservations.
Let's use an example of a restaurant to demonstrate how to set up your resources:
- Restaurant name: My First Restaurant
- Timezone: America/Los_Angeles (formatted in IANA Time Zone Database name.)
- Business hours
- Sunday: Closed
- Monday to Saturday: 5:00 PM - 10:00 PM
- Bookable resources
Resource name Resource type Capacity Duration Small table table 2 guests 2 hours Medium table table 4 guests 2 hours Large table table 8 guests 2 hours
There are two ways to set up your table resources:
- Automatic setup: Provide your resources and business hours in JSON format for automatic configuration.
- Manual configuration: Set up resources and business hours individually in the Google Admin console and Google Calendar.
Option 1: Automatic Setup
By providing resource details in JSON format, OpenCUI simplifies the setup process for Google Calendar based backend. Here's an example of setting up the restaurant automatically:
Buildings
[{
    // The building name as seen by users in Calendar.
    "buildingName": "My First Restaurant",
    // Timezone is stored in the description.
    "description": "{\"timezone\": \"America/Los_Angeles\"}",
    // Unique identifier for the building.
    "buildingId": "My-First-Restaurant",
    // The display names for all floors in this building. Must contain at least one entry.
    "floorNames": ["1"]
}]
Resources
[{
    // The unique ID for the calendar resource.
    "resourceId": "Small-table",
    // The name of the calendar resource.
    "resourceName": "Small table",
    // The table information is encoded in the resourceDescription field.
    "resourceDescription": "{\"@class\":\"me.restaurant.tableReservation.Table\", \"capacity\": 2}",
    // Unique ID for the building a resource is located in.
    "buildingId": "My-First-Restaurant",
    // The type of the calendar resource.
    "resourceType": "table"
}]
Business hours
{
  "Monday": [{ "startTime": "17:00", "endTime": "22:00"}],
  "Tuesday": [{ "startTime": "17:00", "endTime": "22:00"}],
  "Wednesday": [{ "startTime": "17:00", "endTime": "22:00"}],
  "Thursday": [{ "startTime": "17:00", "endTime": "22:00"}],
  "Friday": [{ "startTime": "17:00", "endTime": "22:00"}],
  "Saturday": [{ "startTime": "17:00", "endTime": "22:00"}],
  "Sunday": []
}
After wiring the provider, proceed to initialize the resources by following these steps:
- Navigate to Initialization tab.
- Follow set up Google calendar reservation provider to input the Service account key, Customer ID, Delegated user and Reservation calendar.
- Fill in Buildings, Resources and Business hours as outlined above.
Option 2: Manual configuration
Alternatively, you can choose to add resources manually by following these steps:
- In the Google Admin console, start by adding buildings as locations. Then, proceed to add resources for each location to make them available for user bookings
- In the Google Calendar, set your business hours, ensuring to block off times when reservations are not accepted, such as during closed hours.
Add resources in Admin console
To add resources, it is essential to associate them with specific buildings in the Google Admin. Follow these steps after logging into your Google Admin console:
Add a building
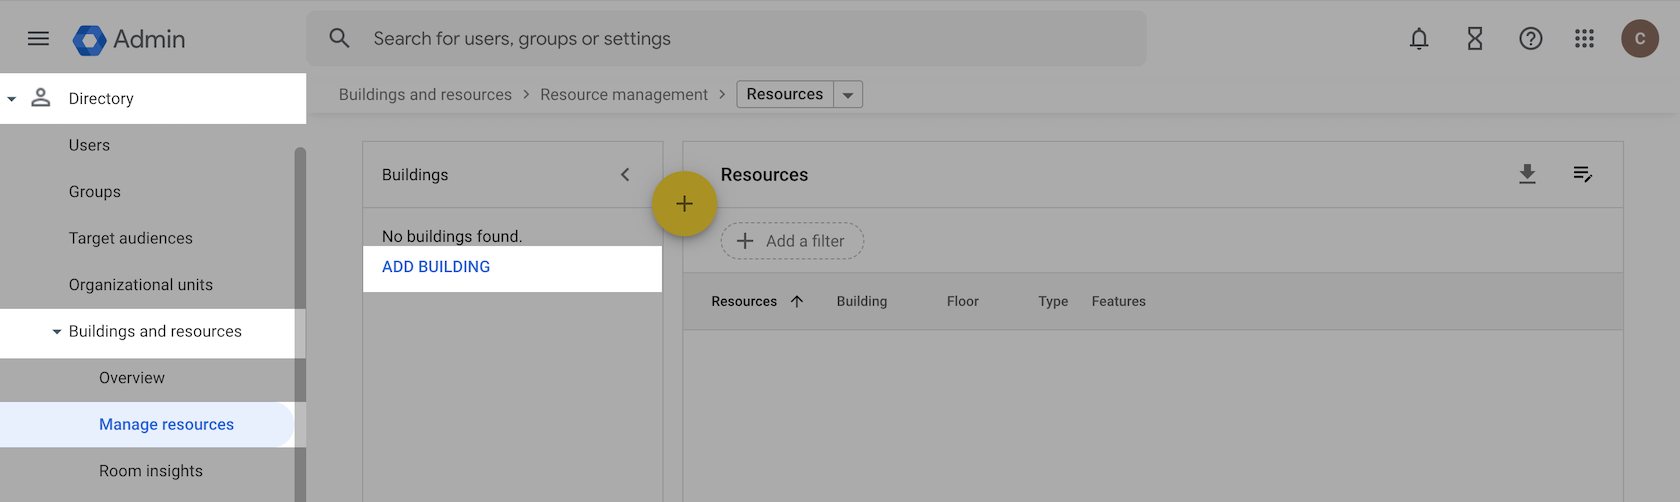
Navigate to the Buildings section:
- From the Main Menu in the Google Admin console, select Directory > Buildings and resources > Manage resources.
- Click ADD BUILDING.
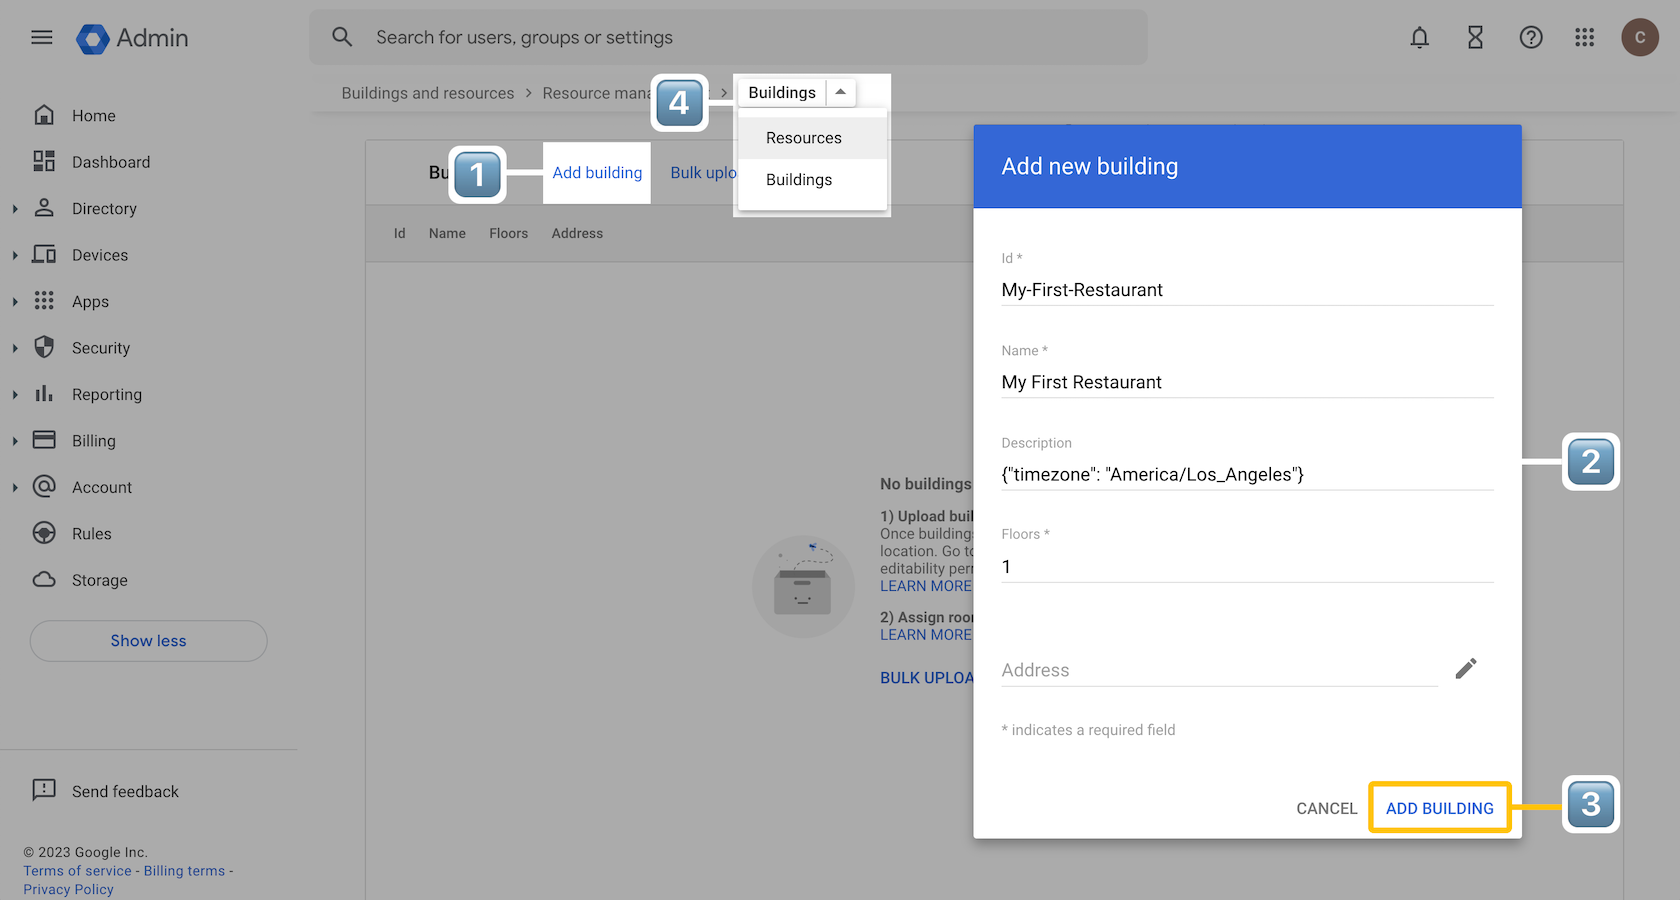
Add a new building:
- In the Buildings section, click Add building.
- Fill in the form with the following information and add:
- Id: My-First-Restaurant
- Name: My First Restaurant
- Description:
{"timezone": "America/Los_Angeles"} - Floors: 1
- Click ADD BUILDING.
- Switch back to Resources.
Add resources
To add the first resource based on the business information :
- In the Resources section, click Add new resource.
- Fill in the form with the following information:
- Category: Other resource
- Type: table
- Building: My First Restaurant
- Resource name: Small table
- Description (internal):
{"@class":"demo.opencui.tableReservation.Table", "capacity": 2}
- Click ADD RESOURCE.

For the additional two resources, repeat the process with updated information in the Resource name and Description fields.
- Medium table:
{"@class":"demo.opencui.tableReservation.Table", "capacity": 4} - Large table:
{"@class":"demo.opencui.tableReservation.Table", "capacity": 8}
- Medium table:
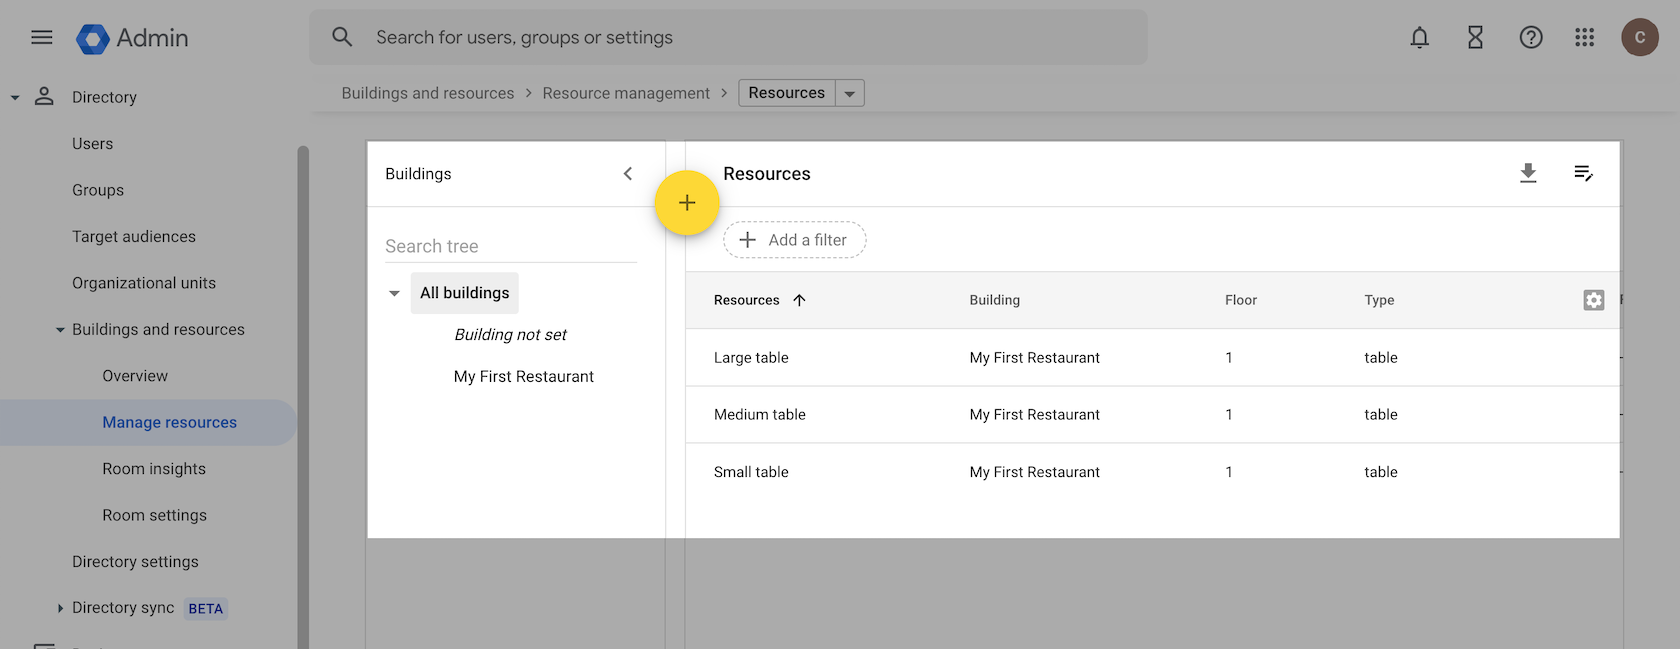
Upon completing these steps, your building and resources setup should mirror the example depicted in the screenshot below.
Block time in Google Calendar
To ensure a seamless reservation process and prevent bookings during closed hours, follow these steps to block off unavailable times in Google Calendar:
- Select or create a dedicated reservation calendar for managing reservation events.
- When creating a resource in the Google Admin, a corresponding resource calendar is automatically generated. Add these resource calendars to your main calendar for event management.
- Block off time slots by responding to event invitations in the resource calendars to confirm the unavailability of certain time slots.
TIP
Before you start, make sure you are an admin first, then sign in to your Google Calendar.
Add events to block time
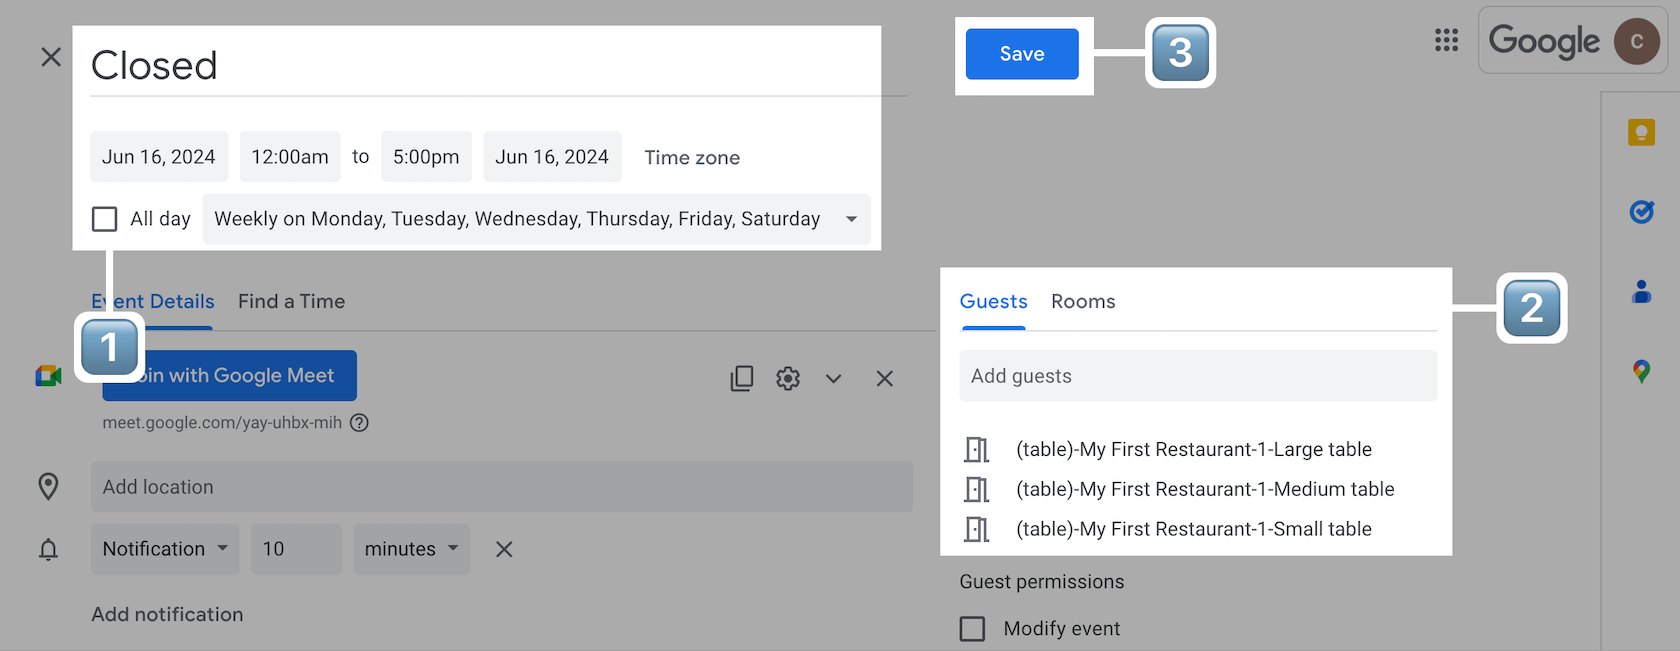
In the reservation calendar, double-click the schedule.
Specify the event details and click Save:
- Title: Closed
- Time:
12:00amto5:00pm(Select appropriate start and end dates based on the current date.) - Repeat: (Custom) Weekly on Monday, Tuesday, Wednesday, Thursday, Friday, Saturday
- Rooms:
- (table)-My First Restaurant-1-Large table
- (table)-My First Restaurant-1-Medium table
- (table)-My First Restaurant-1-Small table
Ceate additional events by repeating the process with adjusted time and Repeat fields for different time slots:
- Event 2
- Time:
10:00pmto11:59am(Select appropriate start and end dates based on the current date.) - Repeat: Weekly on Monday, Tuesday, Wednesday, Thursday, Friday, Saturday
- Time:
- Event 3
- Time: Select appropriate start and end dates based on the current date. (e.g.,
Jun 16, 2024toJun 16, 2024) - Repeat: Weekly on Sunday
- Time: Select appropriate start and end dates based on the current date. (e.g.,
- Event 2
Add resources calendar
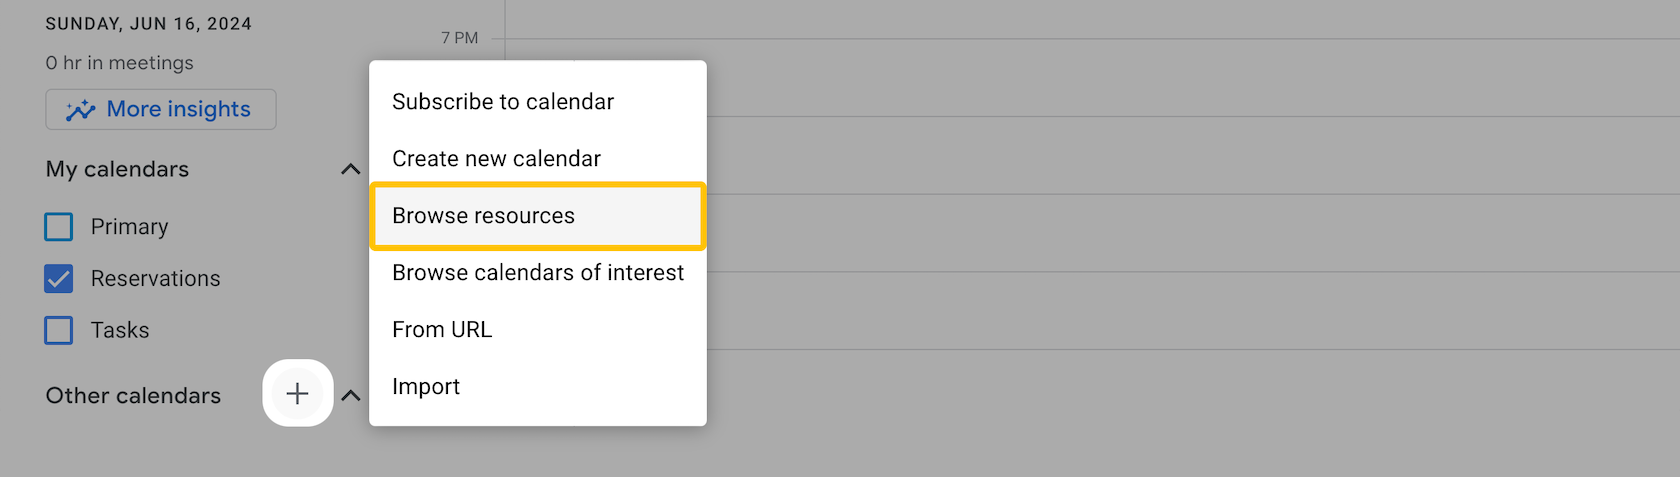
On Other calendars, click + > Browse resources. If you don't see this option, wait a few hours for ACL changes to take effect before managing resources.
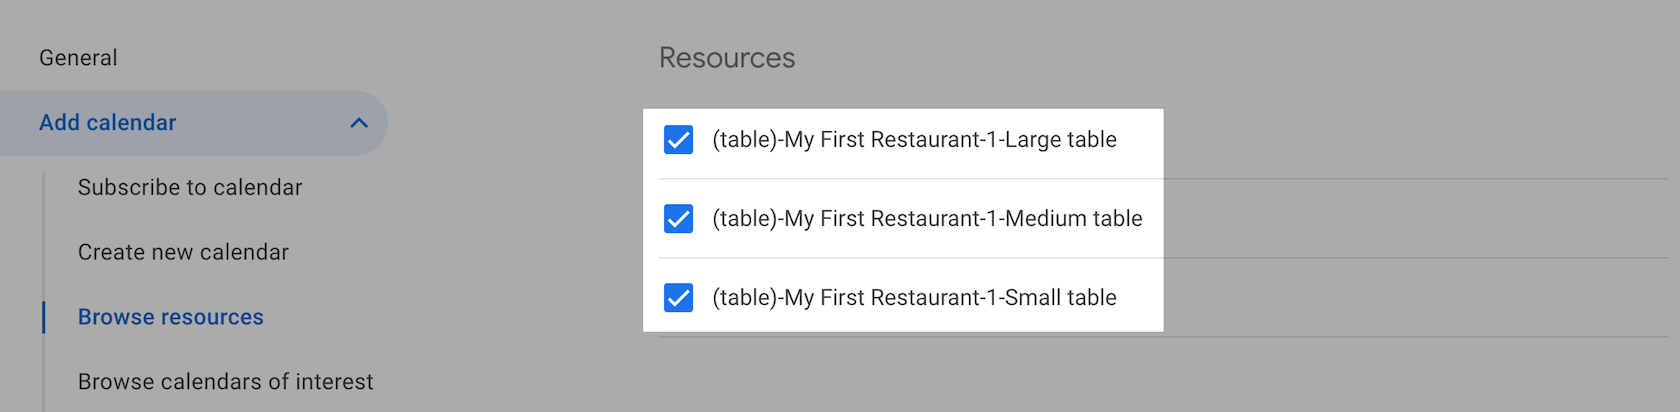
Tick the table resources you need.
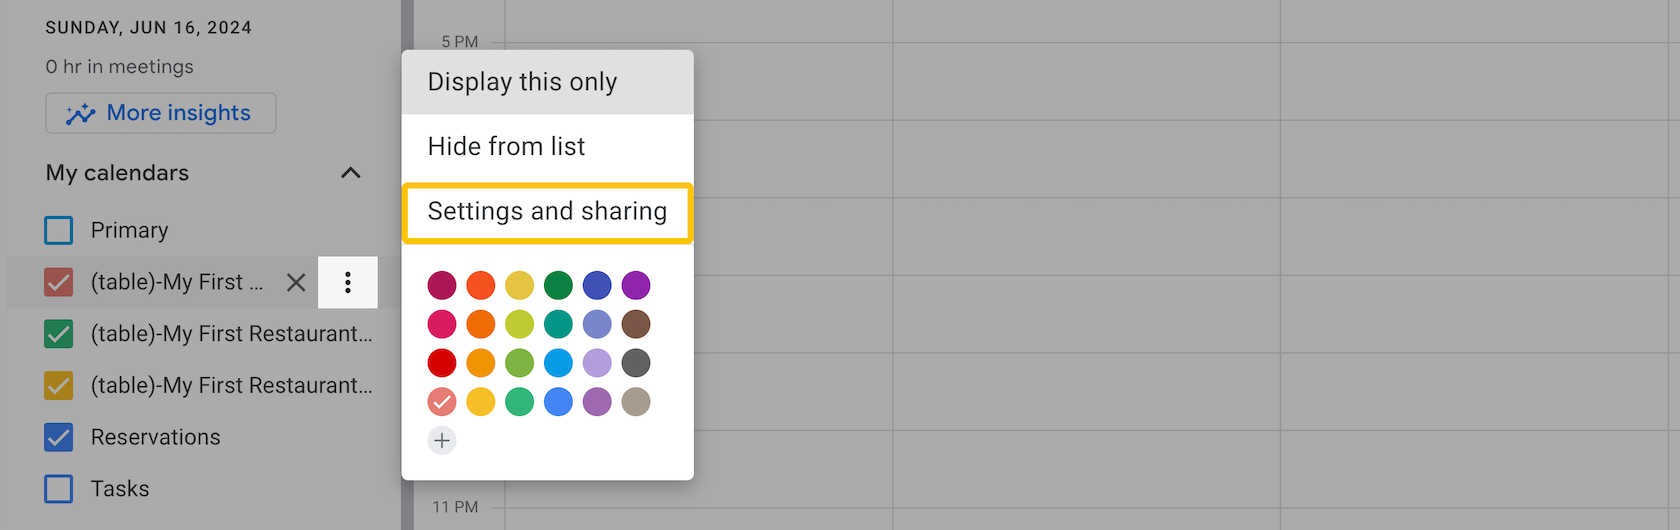
Back to your calendars, choose one resource calendar, and click Settings and sharing.
Ensure the timezone aligns with the location for accurate scheduling.

Verify and adjust the timezone settings for all resource calendars to maintain scheduling accuracy.
Respond to event invitations
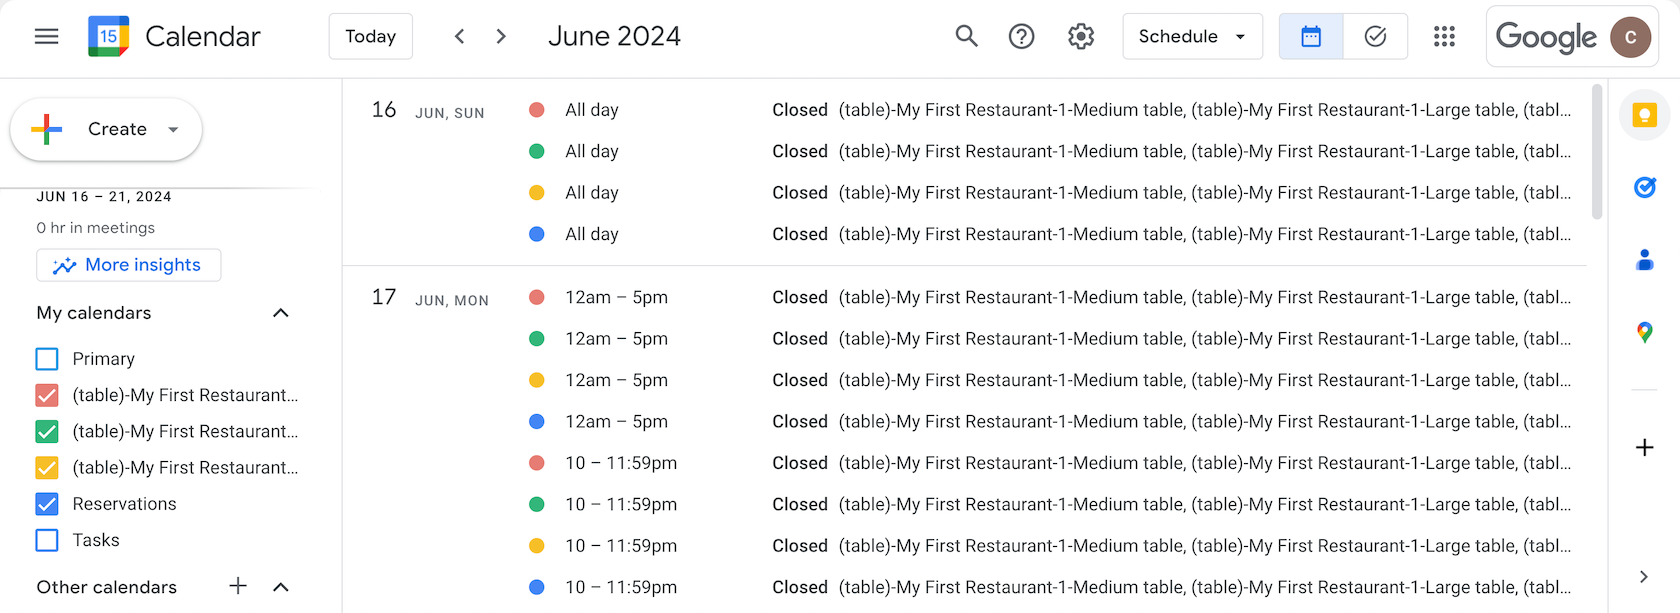
- Open each resource calendar and locate the three events that you added.
- At the bottom of each event, select Yes as a response for all recurring events.
After completing these steps, your resource calendars should looks like the screenshot below.
Reuse tableReservation module
Let's proceed with creating a table reservation chatbot and reusing the functionalities of the table reservation module.
Import the module
- Create a chatbot and add the English(en) language.
- Import the table reservation module into your chatbot.
Configure restaurant inforamtion
To tailor the reservation process to your restaurant's needs, follow these steps to configure restaurant information in corresponding types:
- Enter the chatbot you just created.
- Under the Workspace tab, select type
demo.opencui.tableReservation.RestaurantInfo. - Within the type
RestaurantInfo, add expressions for each label:- ReservationTitle: Title of the reservation event in the Google Calendar.
- Location: Name of the building in the Google Admin.
- MaxTableSize: Maximum capacity allowed for a table.
- Click Workspace tab, select type
demo.opencui.tableReservation.TablePreference. - Within the type
TablePreference, in the Slots section, select slotdefaultDuration. - Inside the slot
defaultDuration, switch to the Interaction tab.- In the Initialization section, click Add.
- Enter the default duration in seconds for a single reservation (e.g., 7200 for a 2-hour reservation).
- Click Save.
Wire the provider
To access the reservation API functionalities, you need to declare a reservation service and wire the reservation provider to this service. Here's how you can wire the reservation provider:
- Enter the chatbot you just created.
- In the navigation bar, select the Settings tab and head to Integrations page. In the Debug service provider section:
- Click Select provider and select
services.opencui.reservation.IReservationand thenservices.opencui.googleCalendarReservation. - Follow set up Google calendar reservation provider to finalize this integration.
- Click Select provider and select
Test the chatbot
Now, it's time to test your chatbot for making a table reservation. Here's how you can do it:
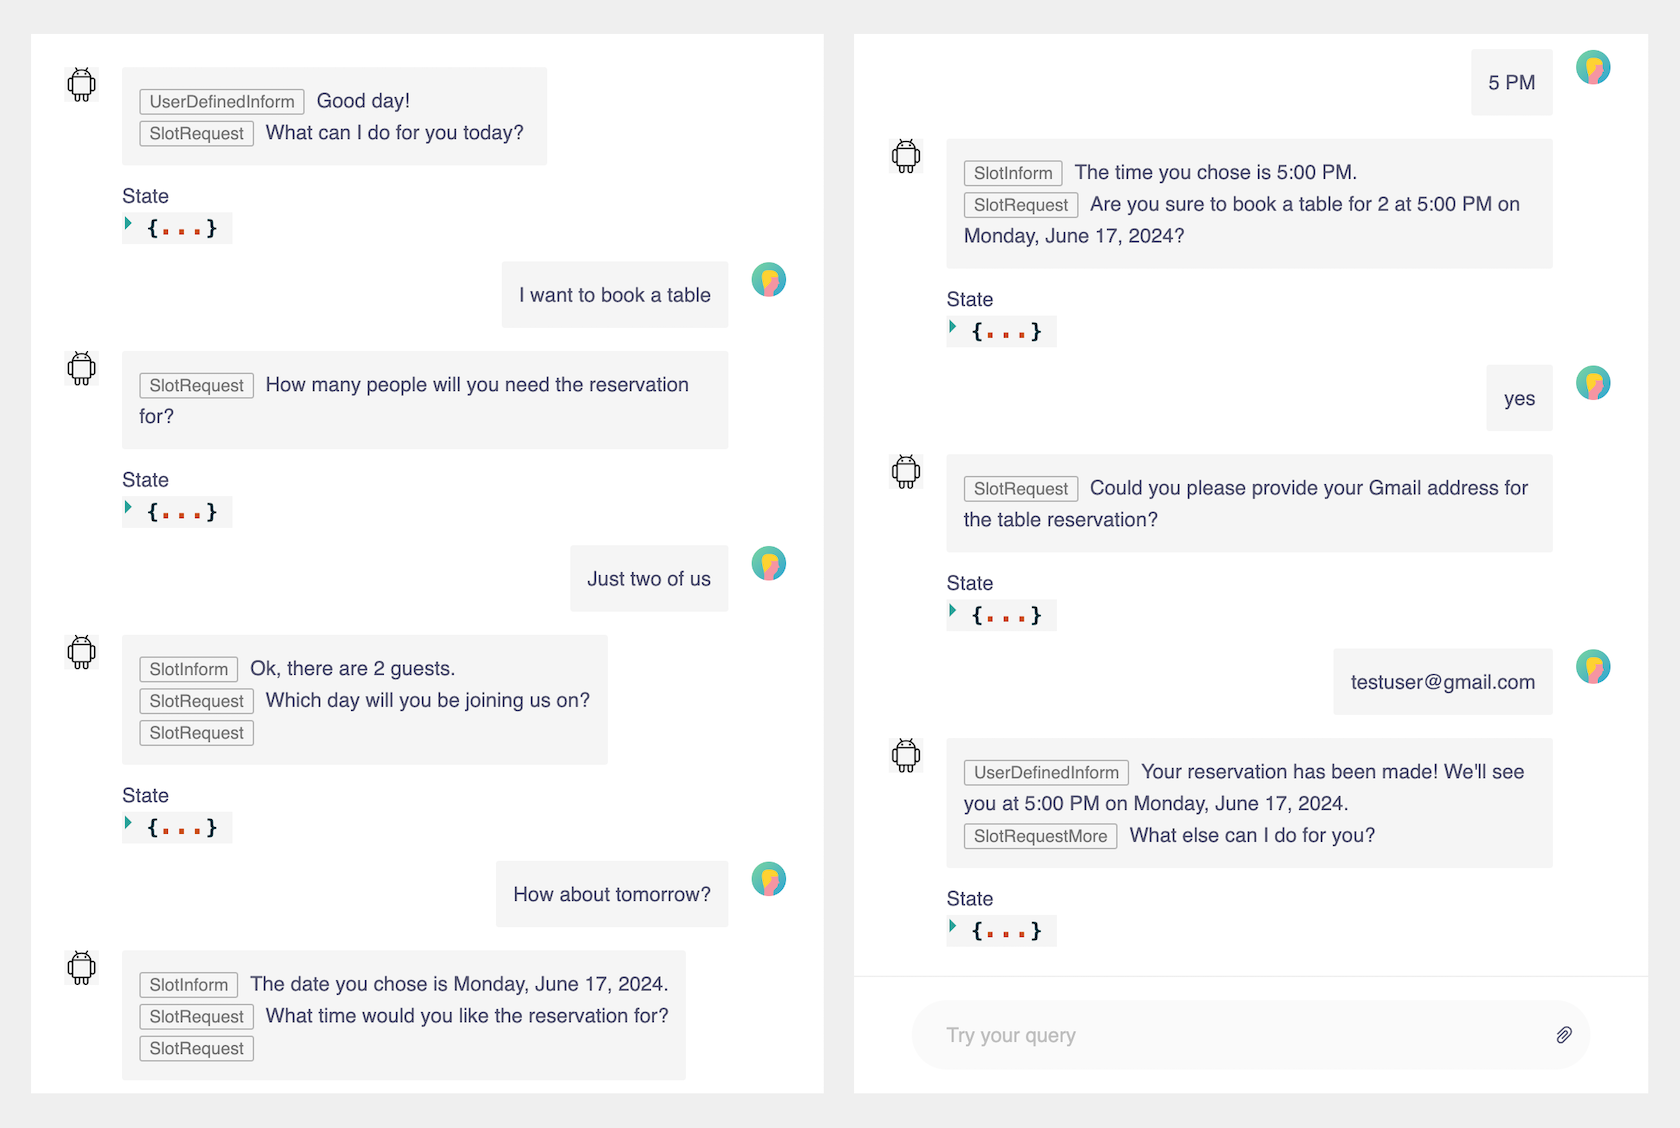
Use Debug to initiate the reservation process by sending "I want to book a table". Then provide the number of guests, date and time. If there is an available table, you can book it successfully. For example:
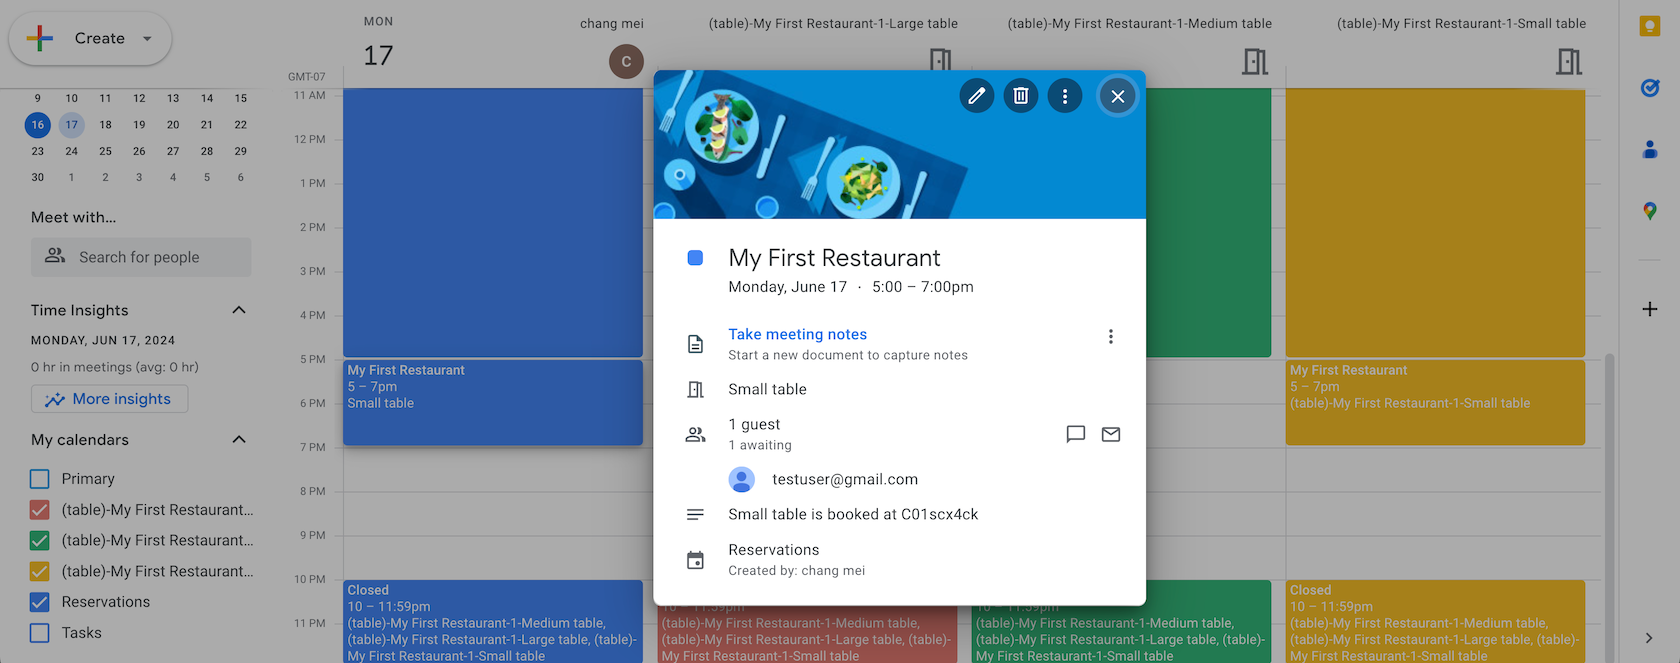
After making a reservation, verify the booking in your Google Calendar. The screenshot below illustrates the reservation made in the previous example:
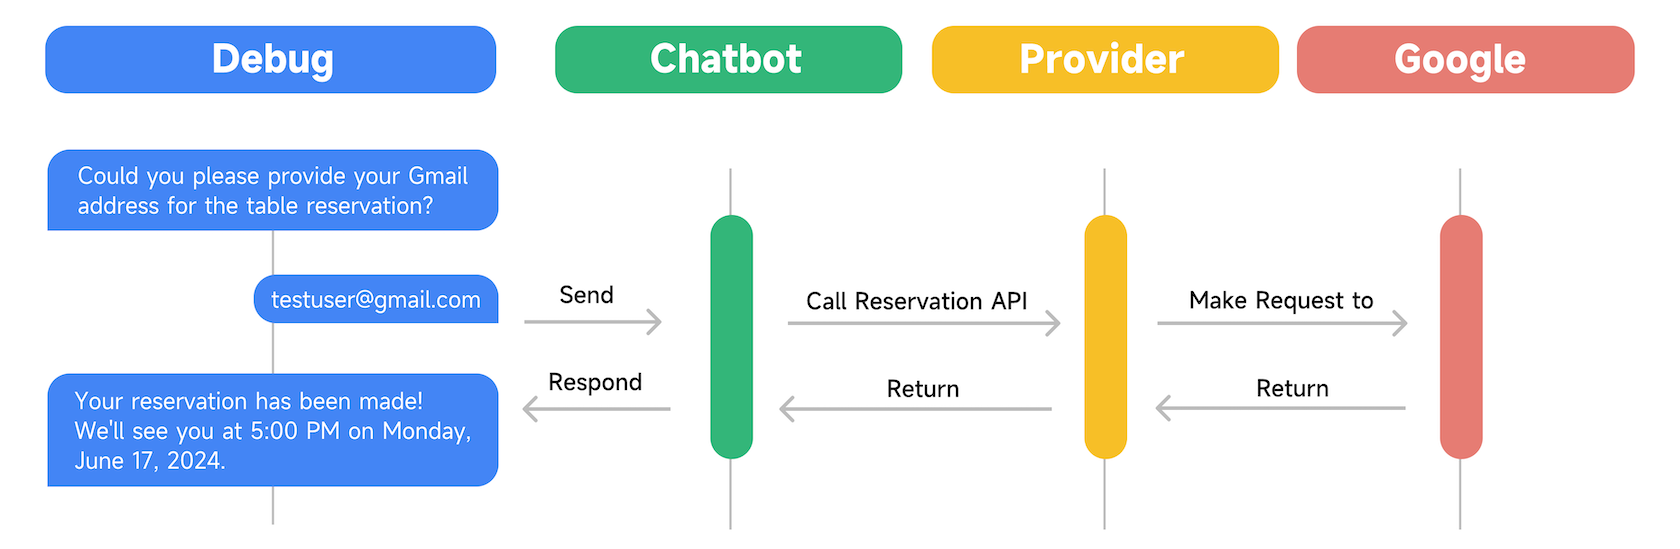
The image below depicts the process of how the reservation is successfully completed.
:🎉: Congratulations on building your table reservation chatbot! For more exploration, refer to the Test cases in the tableReservationBot chatbot.